|
View the sector space of disk devices and control the display format.
When the item in the main window of the Fomsoft Data Recovery "View" program is activated, a drop-down menu appears on the screen,
shown in Fig. 57.
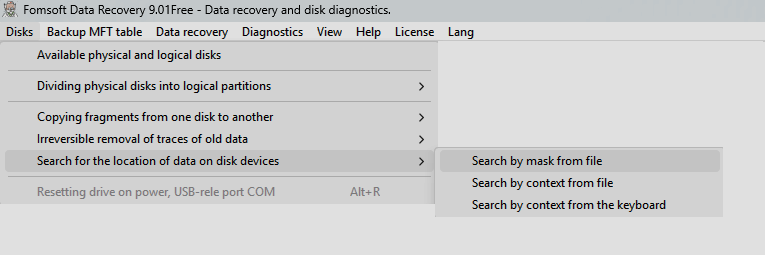
Fig. 57. Drop-down menu in the main window «View».
The drop-down menu of the item in the main window «View» consists of three sub-items:
- Viewing disk space.
- Navigation in the sector space.
- Data interpretation format.
View the sector space of disk devices.
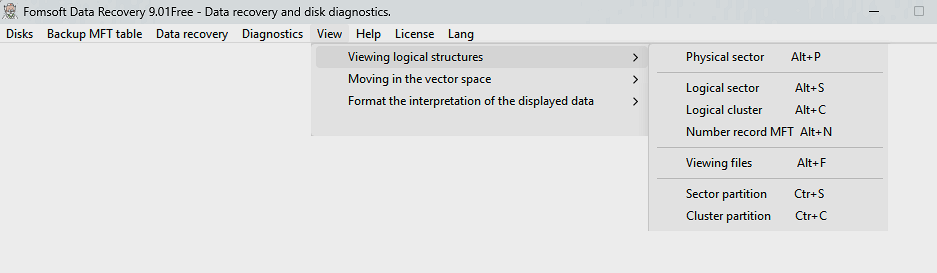
Fig. 58. Sub-item of the submenu "Viewing the sector space".
The program allows you to view the sector space of disk devices by specifying the addresses of various elements of file
structures, while the following addresses of elements can be set:
View the contents of the physical sectors of disk devices.
To view the contents of the physical sectors on disk devices, use the keyboard shortcut Alt+P or
call the sub-item "Physical sector" in the menu "View". In this case, a dialog panel for selecting
the physical disk to be viewed and a window for entering the address of the desired sector (LBA) will appear on the screen, Fig. 59.

Fig. 59. Viewing the contents of physical sector 2048 on disk No. 1.
Viewing the contents of logical disk sectors.
ПThe contents of the logical sectors on disk devices are viewed by pressing the hotkey combination Alt+S
or by calling the sub-item "Logical sector" in the menu "View". In this case, the program, depending on the type
of file system, displays a dialog box for entering the value of the number of the logical sector being viewed, Fig. 60 or 61.
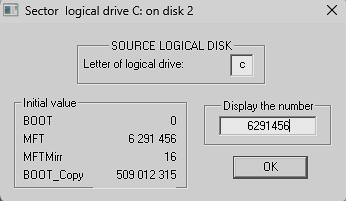
Fig. 60. Viewing the logical disk sector C:.
| 
Fig. 61. Viewing the sector of the logical disk K:.
|
Viewing the contents of logical disk clusters.
To view the contents of logical clusters on disks, press the keyboard shortcut Alt+C
or call the sub-item "Logical cluster" in the menu "View". The program, depending on the type
of file system, displays a dialog box for entering the value of the number of the logical cluster being viewed, Fig. 62 or 63.
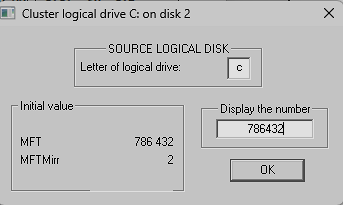
Fig. 62. Viewing the logical disk cluster F:.
| 
Fig. 63. Viewing the logical disk cluster K:.
|
Viewing the contents of the MFT table entries.
You can view the MFT table entry using the Alt+ keyboard shortcut.With or
by calling the sub-item "MFT entry No." in the menu "View".
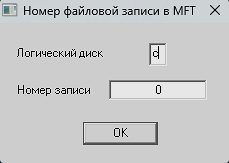
Fig. 64. Viewing the FILE Record entry of the MFT table of the logical disk C:.
Viewing the contents of logical sectors of logical partitions.
To view the logical sectors on hidden disks (partitioning), you can use the keyboard shortcut Ctrl+S or
by calling the sub-item "Logical partition sector" in the menu "View".
At the same time, you need to enter the disk number and partition number, depending on the file system, NTFS or FAT32, a dialog
box will appear on the screen, shown in Fig. 65 or 66.

Fig. 65. Viewing the logical sector of the hidden partition 2 on disk 2.
| 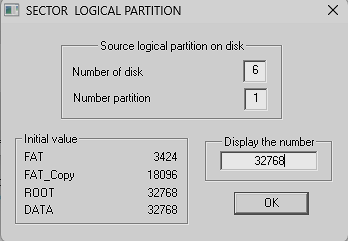
Fig. 66. Viewing the logical sector of partition 1 on disk 6.
|
Viewing the contents of logical clusters of logical partitions.
To view the contents of logical clusters on disabled partitions, you can use the keyboard shortcut Ctrl+C or
call the sub-item "Logical partition cluster" in the menu "Disks".
In this case, you need to enter the disk number and the partition number. Depending on the file system, NTFS or FAT32, the screen will display
one of the dialog boxes shown in Fig. 67 or 68.
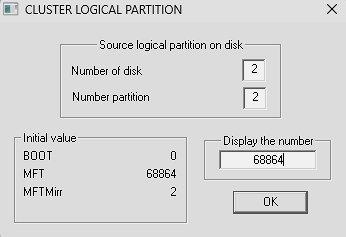
Fig. 67. Viewing the logical cluster of hidden partition 2 on disk 2.
| 
Fig. 68. Viewing the logical cluster of partition 1 on disk 6.
|
Viewing the contents of a copy of the GPT table.
A copy of the GPT table is always located at the very end of the disk. To view its contents, you can use the keyboard
shortcut Alt+G, Fig. 68a:
 Fig. 68a. Viewing a copy of the GPT table, the selected disk.
After specifying the disk number, the contents of the GPT table will be displayed, Fig. 68b:
 Fig. 68b. Displaying the contents of the GPT disk layout table.
This table shows the information of the first eight sections. Partitions with the user's logical disks are placed in sections
named The basic data section.
Using information about the beginning of the partition, where the boot sector of the logical disk is located,
you can easily restore data in case of destruction or damage to the beginning of the hard disk..
Navigation inside the sector space of the device being viewed.
Navigation inside the sector space of the viewed disk can be performed from
the drop-down menu shown in Fig. 69.
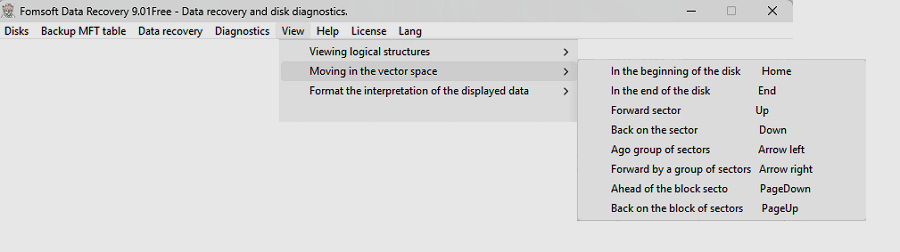 Fig. 69. Navigation inside the sector space of the selected type of file structures.
Keyboard shortcuts can be used for ease of navigation.:
| No. | Actions | Keyboard shortcuts
|
|---|
| 1 | To the beginning of the disc | Home
|
|---|
| 2 | To the end of the disc | End
|
|---|
| 3 | Back to the sector | Up arrow
|
|---|
| 4 | Forward to the sector | Down arrow
|
|---|
| 5 | Back to two sectors | Left arrow
|
|---|
| 6 | Two sectors ahead | Right arrow
|
|---|
| 7 | Back to 128 sectors | Page UP
|
|---|
| 8 | Forward by 128 sectors | Page Down
|
|---|
Data interpretation format management.
The Fomsoft Data Recovery software allows you to interpret the viewed data in terms of various
elements of NTFS or FAT file structures. The interpretation format is controlled by calling the corresponding
submenu item shown in Fig. 69 or by pressing one of the function keys.
 Fig. 70. Managing the format of interpretation of the viewed data.
ВIt is possible to interpret the data of the sector space of the viewed disk in the following file structure formats:
Viewing the contents of sectors in hexadecimal format.
o view the contents of the current sectors, it is most convenient to use the F2 function key.
Figure 71 shows the display of the corresponding screen.
 Fig.e 71. Viewing sectors in hexadecimal format.
Displaying the contents of two consecutive sectors in terms of an MFT table entry.
Two consecutive sectors interpreted as FILE Record data from the Main File Table (MFT) are viewed
by pressing the F3 function key.
An example of displaying a FILE Record that describes data placed in separate areas of the disk's sector space, the so-called
non-resident files, is shown in Fig. 72.
For non-resident files, the FILE Record contains lists of segments (Data runs) where the file data is recorded.
Figure 72 shows the entry describing the beginning of the MFT table. This file is named $MFT and is located
on the disk in ten segments, fragments:

Figu. 72. Viewing a FILE Record describing a non-resident file.
| 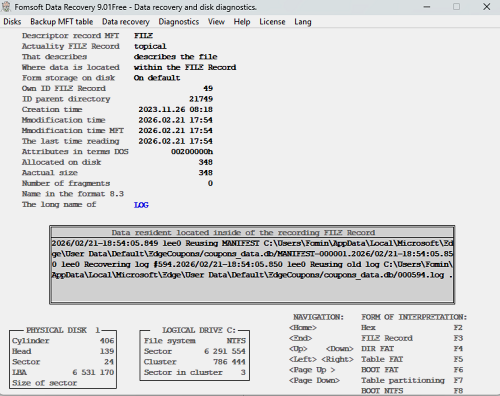
Fig. 73. An example of a FILE Record describing a resident file.
|
Table of contents of the FAT operating system directories.
To view the current sector in the directory table of contents format, press the F4 function key.
An example of displaying directory sectors is shown in Fig. 74.

Fig. 74a. The table of contents of the FAT-32 operating system catalogs.
| 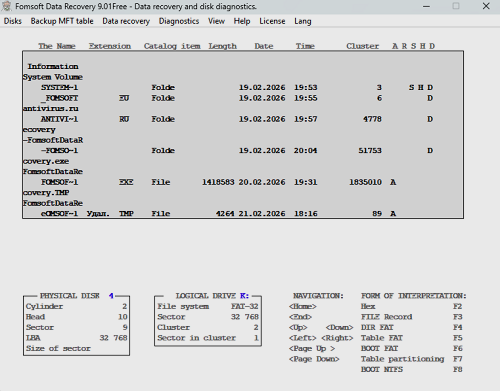
Fig. 74b. The table of contents of the FAT-64 operating system catalogs.
|
Each sector of the FAT-32 table of contents contains information about 16 elements of the catalog table of contents. Each element
of the catalog table of contents can describe information about a file with a short name in format 8.3, a volume label, or
a 13-byte long name element.
FAT-32/64 or FAT-16 file allocation table
To view the current sector in the file layout table format, use the F4 function key.
Pressing this key again switches the interpretation between FAT32/64 or FAT_16 modes.
Unlike the FAT file system, not all FAT-64 files will be marked in the FAT table, and only fragmented files will be present in the FAT table.
Non-fragmented files are defined and fully described in the corresponding directory entry for the file.
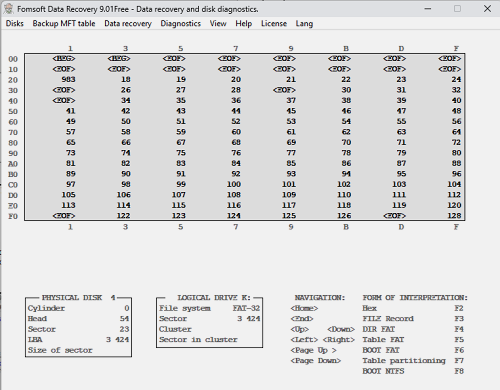
Fig. 75. Interpretation of sector contents in FAT-32/64 format.
| 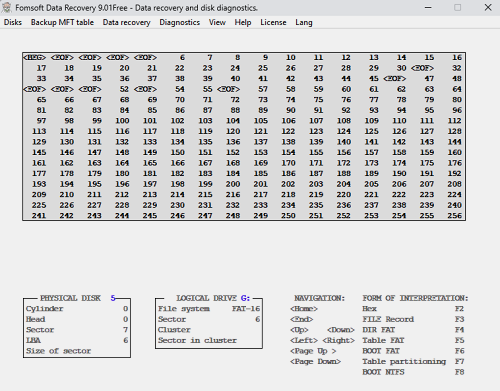
Fig. 76. Interpretation of sector contents in FAT-16 format.
|
The boot sectors of the FAT-16/32 and FAT-64 file systems.
To display the information of the current sector in terms of the boot sector of the FAT file system, use
the F6 function key. In this case, the interpretation of FAT-16/32 sector data will appear on the screen, and the
next time the F6 key is pressed, it will be FAT-64. 77 and 77a:
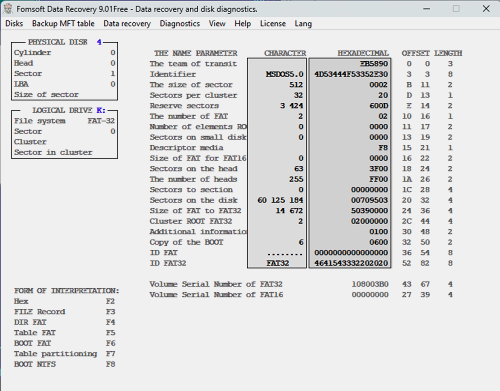
Fig. 77. Interpretation of the contents of the boot sector in FAT-32/16 format.
| 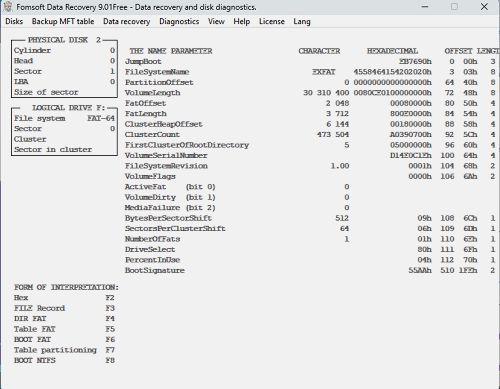
Fig. 77a. Interpretation of the contents of the boot sector in FAT-64 format.
|
Disk partition table in MBR or GPT format.
The FomsoftDataRecovery program, when pressing the F7 function button, determines which
file system structure the contents of the current sector belong to, from the position of the physical disk partition table
. If the data corresponds to the GPT structure (GUID Partition Table), the dialog panel
shown in Fig. 79. Otherwise, the information is displayed based on the assumption that this
is the data of the Master Boot Record (MBR), Fig. 78.

Fig. 78. The partition table of the disk in MBR format.
| 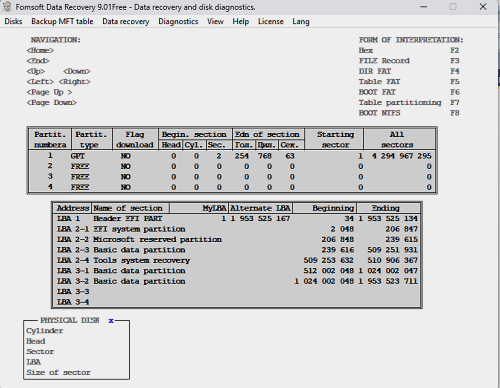
Fig. 79. Disk partition table in GPT format.
|
The boot sector of the MFT file system.
To view the contents of the current sector in the interpretation of the MFT boot sector structure, you need
to use the F8 function key. When it is clicked, the contents of the current sector
are interpreted as data from the MTFS boot sector, Fig. 80.
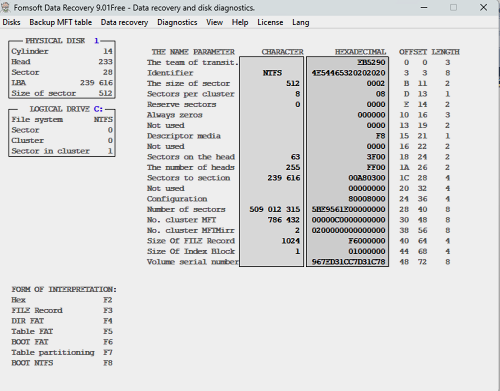 Fig. 80. The boot sector of the MFT file system..
|
